
CodeBot Wiki 是一款基于大语言模型的智能文档生成工具,能够自动解析项目代码,生成结构清晰、内容专业的项目 Wiki。它不仅覆盖项目概览、核心模块、关键逻辑等信息,还支持交互式理解,更适合团队协作与持续迭代,是理解开源项目或内部系统的理想助手!

本期解读项目地址:https://github.com/deepseek-ai/DeepSeek-OCR
概览
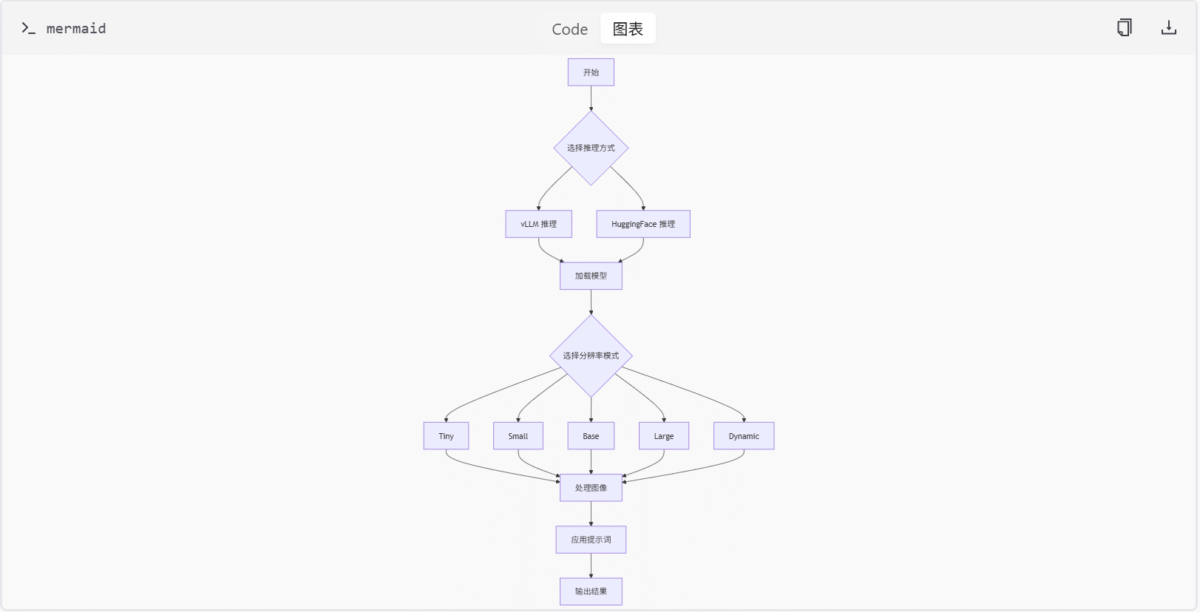
DeepSeek-OCR 是一个基于视觉与语言模型的 OCR(光学字符识别)系统,旨在从大语言模型(LLM)视角研究视觉编码器的作用。该项目支持多种图像和 PDF 的 OCR 推理任务,并提供两种推理方式:基于 vLLM 的高效推理框架和基于 HuggingFace Transformers 的标准实现。用户可以利用不同的分辨率模式(如 Tiny、Small、Base、Large 和 Dynamic)来处理图像输入,并结合预设提示词(prompt)完成文档转换、图像解析、布局提取等任务。
该系统整合了多个模块,包括 特征编码模块、配置管理模块、OCR处理模块 和 图像处理模块,共同构成了一个完整的 OCR 解决方案。通过这些模块的协同工作,DeepSeek-OCR 能够实现高精度的文字识别和结构化输出。
项目架构
DeepSeek-OCR 的整体架构如下图所示:
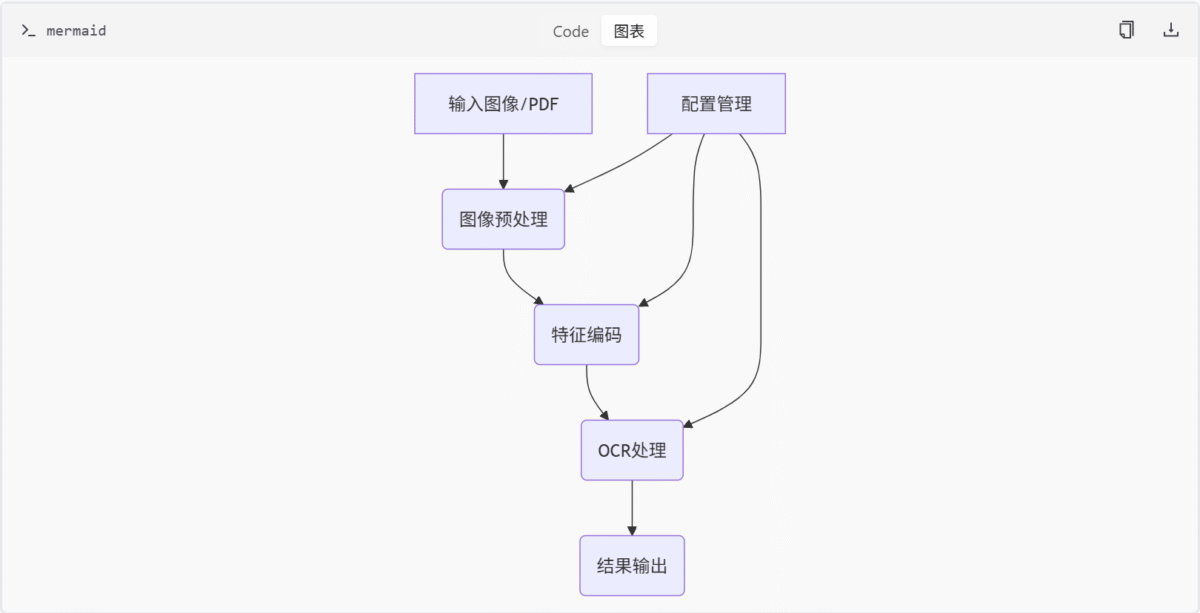
核心组件
- 特征编码模块:负责图像特征提取与编码,整合了 CLIP 和 SAM 架构。
- 配置管理模块:定义 OCR 模型运行参数,包括图像处理尺寸、裁剪模式等。
- OCR处理模块:加载并运行 DeepSeek-OCR 模型,实现图像文字 OCR 处理。
- 图像处理模块:负责OCR模型的图像预处理和文本融合。
特征编码模块详解
特征编码模块是 DeepSeek-OCR 项目中负责图像特征提取与编码的核心组件。该模块整合了多种先进的视觉编码架构,包括基于 CLIP 的视觉编码器、基于 SAM 的图像编码器以及支持多种投影结构的 MLP 投影器。这些组件共同构成了一个灵活且高效的特征提取系统,用于将输入图像转换为高维特征表示,供后续的 OCR 任务使用。
架构概览
特征编码模块主要由以下三个核心组件构成:
- MlpProjector:用于构建多种投影器结构(如线性、MLP-GELU、下采样等),支持 token pooling 和特征融合。
- CLIP 视觉编码器:实现 CLIP 架构的视觉编码模块,包括图像嵌入、多头注意力、Transformer Block 和整体模型类。
- SAM 图像编码器 (ImageEncoderViT):实现基于 ViT 的图像编码器,包含 Patch Embedding、Attention、Transformer Block 和 Neck 结构。
MlpProjector
MlpProjector 类定义在 build_linear.py 文件中,用于构建多种投影器结构,支持 token pooling 和特征融合。它根据配置选择不同的网络结构,并实现前向传播逻辑和 FLOPs 估算。
类定义
class MlpProjector(nn.Module):
    def __init__(self, config):
        super().__init__()
        self.config = config
        if config.projector_type == 'linear':
            self.projector = nn.Linear(config.input_dim, config.output_dim)
        elif config.projector_type == 'mlp_gelu':
            self.projector = nn.Sequential(
                nn.Linear(config.input_dim, config.hidden_dim),
                nn.GELU(),
                nn.Linear(config.hidden_dim, config.output_dim)
            )
        elif config.projector_type == 'downsample':
            self.projector = nn.Sequential(
                nn.Conv2d(config.input_dim, config.hidden_dim, kernel_size=3, stride=2, padding=1),
                nn.GELU(),
                nn.Conv2d(config.hidden_dim, config.output_dim, kernel_size=3, stride=2, padding=1)
            )
        else:
            raise ValueError(f"Unknown projector type: {config.projector_type}")

    def forward(self, x):
        return self.projector(x)

    def flops(self):
        pass
CLIP 视觉编码器
clip_sdpa.py 文件实现了 CLIP 架构的视觉编码器模块,包括图像嵌入、多头注意力、Transformer Block 和整体模型类。它支持 Flash Attention 和位置嵌入插值,并提供 ViT 模型构建与测试接口。
类定义
class VitModel(nn.Module):
    def __init__(self, config):
        super().__init__()
        self.config = config
        self.embeddings = CLIPVisionEmbeddings(config)
        self.pre_layrnorm = nn.LayerNorm(config.hidden_size)
        self.encoder = CLIPEncoder(config)
        self.post_layernorm = nn.LayerNorm(config.hidden_size)

    def forward(self, pixel_values):
        embedding_output = self.embeddings(pixel_values)
        embedding_output = self.pre_layrnorm(embedding_output)
        encoder_outputs = self.encoder(embedding_output)
        sequence_output = encoder_outputs[0]
        pooled_output = sequence_output[:, 0, :]
        pooled_output = self.post_layernorm(pooled_output)
        return (sequence_output, pooled_output) + encoder_outputs[1:]
SAM 图像编码器 (ImageEncoderViT)
sam_vary_sdpa.py 文件实现了基于 ViT 的图像编码器 ImageEncoderViT,包含 Patch Embedding、Attention、Transformer Block 和 Neck 结构。它支持相对位置编码和窗口注意力,并提供 SAM ViT-B 模型构建函数。
类定义
class ImageEncoderViT(nn.Module):
    def __init__(self, config):
        super().__init__()
        self.config = config
        self.patch_embed = PatchEmbed(config)
        self.pos_embed = nn.Parameter(torch.zeros(1, self.patch_embed.num_patches, config.hidden_size))
        self.blocks = nn.ModuleList([
            Block(config) for _ in range(config.num_hidden_layers)
        ])
        self.neck = Neck(config)

    def forward(self, pixel_values):
        x = self.patch_embed(pixel_values)
        x = x + self.pos_embed
        for blk in self.blocks:
            x = blk(x)
        x = self.neck(x)
        return x
Mermaid 图
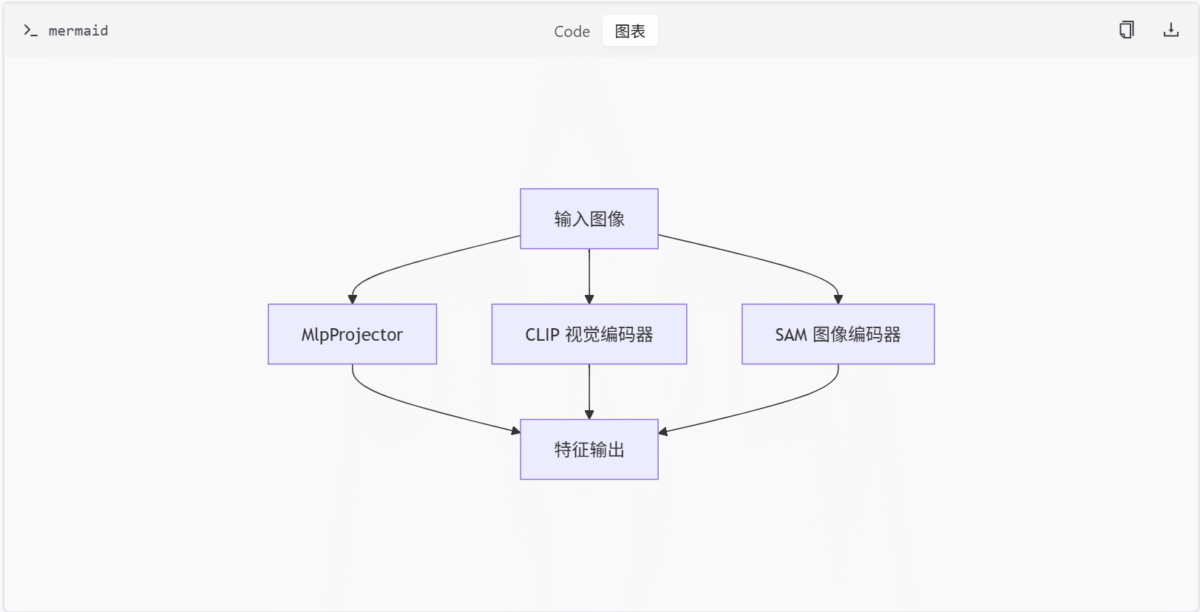
特征编码模块架构图
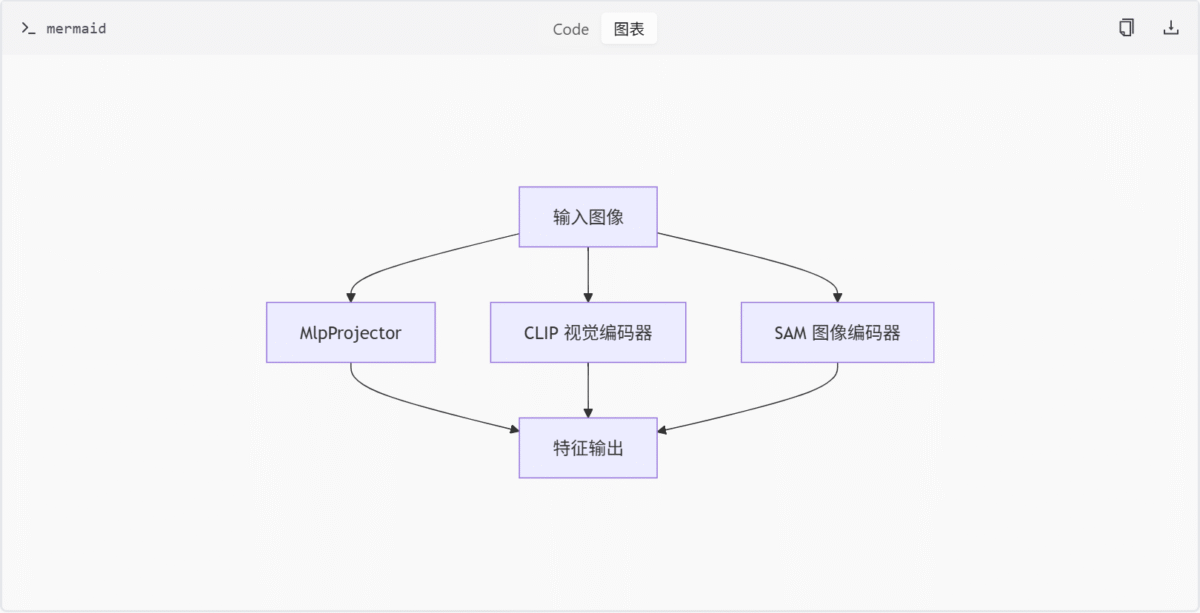
此图展示了特征编码模块的整体架构,输入图像通过三种不同的编码器进行特征提取,最终输出统一的特征表示。
表格
主要功能或组件及其描述
| 组件名称 | 描述 |
|---|---|
| MlpProjector | 用于构建多种投影器结构,支持 token pooling 和特征融合 |
| CLIP 视觉编码器 | 实现 CLIP 架构的视觉编码模块,支持 Flash Attention 和位置嵌入插值 |
| SAM 图像编码器 | 实现基于 ViT 的图像编码器,支持相对位置编码和窗口注意力 |
配置选项及其类型和默认值
| 配置项 | 类型 | 默认值 | 描述 |
|---|---|---|---|
| projector_type | str | ‘linear’ | 投影器类型,可选 ‘linear’, ‘mlp_gelu’, ‘downsample’ |
| input_dim | int | 768 | 输入维度 |
| output_dim | int | 512 | 输出维度 |
| hidden_dim | int | 2048 | 隐藏层维度 |
技术栈
| 技术 | 描述 |
|---|---|
| Python | 主要编程语言 |
| PyTorch | 深度学习框架 |
| HuggingFace Transformers | 模型加载和推理 |
| vLLM | 高效推理框架 |
| CLIP | 视觉编码器 |
| SAM | 图像编码器 |
主要功能
| 功能 | 描述 |
|---|---|
| 多种推理方式 | 支持基于 vLLM 和 HuggingFace Transformers 的推理 |
| 多分辨率模式 | 支持 Tiny、Small、Base、Large 和 Dynamic 模式 |
| 预设提示词 | 提供文档转换、图像解析、布局提取等任务的提示词 |
| 安装指南 | 提供详细的依赖安装和环境配置说明 |
| 示例代码 | 提供快速上手的示例代码和可视化结果展示 |
结论
DeepSeek-OCR 通过整合先进的视觉与语言模型技术,为 OCR 任务提供了一个强大而灵活的解决方案。其模块化的设计使得系统易于扩展和维护,同时支持多种推理方式和分辨率模式,能够满足不同场景下的需求。通过详细的文档和示例代码,开发者可以快速上手并部署该系统。
特征编码模块通过整合多种先进的视觉编码架构,为 DeepSeek-OCR 项目提供了强大且灵活的特征提取能力。MlpProjector、CLIP 视觉编码器 和 SAM 图像编码器 三个核心组件协同工作,能够适应不同的输入图像和任务需求,生成高质量的特征表示,为后续的 OCR 任务奠定了坚实的基础。
快速开始
DeepSeek-OCR 是一个基于视觉与语言模型的 OCR(光学字符识别)系统,旨在从大语言模型(LLM)视角研究视觉编码器的作用。本项目支持多种图像和 PDF 的 OCR 推理任务,并提供两种推理方式:基于 vLLM 的高效推理框架和基于 HuggingFace Transformers 的标准实现。
用户可以利用不同的分辨率模式(如 Tiny、Small、Base、Large 和 Dynamic)来处理图像输入,并结合预设提示词(prompt)完成文档转换、图像解析、布局提取等任务。通过本文档,您可以快速了解如何安装依赖、运行示例代码并查看效果。
安装依赖
为了确保项目在不同环境中能够正确运行,首先需要安装所需的第三方库。这些依赖项已在 requirements.txt 文件中列出。
依赖概览
以下是项目所需的主要依赖及其用途:
| 库名 | 版本 | 描述 |
|---|---|---|
| transformers | ==4.46.3 | 自然语言处理相关库 |
| tokenizers | ==0.20.3 | 文本分词工具 |
| PyMuPDF | – | 支持 PDF 文档处理 |
| img2pdf | – | 将图像转换为 PDF |
| Pillow | – | 图像操作库 |
| numpy | – | 数组操作库 |
| einops | – | 简化张量操作 |
| easydict | – | 提供灵活的字典结构访问方式 |
| addict | – | 提供灵活的字典结构访问方式 |
安装命令
可以通过以下命令安装所有依赖:
pip install -r requirements.txt运行推理任务
DeepSeek-OCR 支持多种推理任务,包括文档转换、图像解析和布局提取。用户可以根据需求选择合适的推理方式和分辨率模式。
推理方式
项目提供了两种推理方式:
- 基于 vLLM 的高效推理框架
- 基于 HuggingFace Transformers 的标准实现
分辨率模式
用户可以选择以下分辨率模式之一来处理图像输入:
- Tiny
- Small
- Base
- Large
- Dynamic
示例代码
以下是一个简单的示例代码,展示了如何使用 DeepSeek-OCR 进行 OCR 推理:
from deepseek_ocr import OCRTask

# 初始化 OCR 任务
task = OCRTask(resolution_mode="Base")

# 加载图像
image_path = "path/to/image.png"
result = task.run(image_path)

# 输出结果
print(result)
架构流程图
下面的流程图展示了 DeepSeek-OCR 的整体架构和数据流:
总结
本文档介绍了 DeepSeek-OCR 项目的快速开始指南,涵盖了依赖安装、推理任务运行以及示例代码等内容。通过本文档,您可以快速上手并体验该项目的强大功能。更多详细信息,请参阅其他相关文档。
图像处理模块
图像处理模块是 DeepSeek-OCR 项目的核心组成部分之一,主要用于对输入图像进行预处理以及与文本的联合处理,以便后续 OCR 模型能够更高效地提取文本信息。该模块涵盖了图像的动态裁剪与分块、标准化处理、图像与文本的融合操作、多尺度处理以及 token 化等功能。此外,它还支持将 <image> 标记替换为图像 token ID,并生成模型所需的 input_ids 和 target_ids。
另一个关键部分是 ngram_norepeat.py 文件中实现的 NoRepeatNGramLogitsProcessor 类,用于在文本生成过程中避免重复 n-gram,从而提升生成文本的多样性和质量。
图像处理核心功能
动态裁剪与分块
图像处理模块支持对输入图像进行动态裁剪和分块处理,以便适应不同尺寸的图像输入。这种处理方式有助于模型更好地聚焦于图像中的关键区域。具体来说,模块提供了如下几个关键函数:
find_closest_aspect_ratio
def find_closest_aspect_ratio(aspect_ratio: float, candidate_ratios: list, width: int, height: int, image_size: int) -> tuple:
    best_ratio_diff = float('inf')
    best_ratio = (1, 1)
    area = width * height
    for ratio in candidate_ratios:
        target_aspect_ratio = ratio[0] / ratio[1]
        ratio_diff = abs(aspect_ratio - target_aspect_ratio)
        if ratio_diff < best_ratio_diff:
            best_ratio_diff = ratio_diff
            best_ratio = ratio
        elif ratio_diff == best_ratio_diff:
            if width * ratio[1] / ratio[0] * height > area:
                best_ratio = ratio
    return best_ratio
count_tiles
def count_tiles(width: int, height: int, min_num_crops: int, max_num_crops: int, image_size: int) -> int:
    candidate_num_crops = []
    for num_crops in range(min_num_crops, max_num_crops + 1):
        candidate_num_crops.append(num_crops)
    aspect_ratio = width / height
    best_ratio = find_closest_aspect_ratio(aspect_ratio, [(i, j) for i in candidate_num_crops for j in candidate_num_crops], width, height, image_size)
    return best_ratio[0] * best_ratio[1]
dynamic_preprocess
def dynamic_preprocess(image: Image.Image, min_num_crops: int = 1, max_num_crops: int = 12, image_size: int = 336, use_thumbnail: bool = False) -> list:
    width, height = image.size
    num_crops = count_tiles(width, height, min_num_crops, max_num_crops, image_size)
    if num_crops == 1:
        resized_image = image.resize((image_size, image_size), Image.ANTIALIAS)
        return [resized_image]
    else:
        grid = math.sqrt(num_crops)
        if grid != int(grid):
            raise ValueError("Number of crops must be a perfect square.")
        grid = int(grid)
        crop_width = width // grid
        crop_height = height // grid
        crops = []
        for i in range(grid):
            for j in range(grid):
                left = j * crop_width
                upper = i * crop_height
                right = left + crop_width
                lower = upper + crop_height
                cropped_image = image.crop((left, upper, right, lower))
                resized_image = cropped_image.resize((image_size, image_size), Image.ANTIALIAS)
                crops.append(resized_image)
        if use_thumbnail:
            thumbnail = image.copy()
            thumbnail.thumbnail((image_size, image_size), Image.ANTIALIAS)
            crops.insert(0, thumbnail)
        return crops
图像标准化
为了确保模型输入的一致性,模块会对图像进行标准化处理,通常包括归一化像素值等操作。这一步骤由 ImageTransform 类完成:
class ImageTransform:
    def __init__(self, mean: list = [0.48145466, 0.4578275, 0.40821073], std: list = [0.26862954, 0.26130258, 0.27577711]):
        self.mean = mean
        self.std = std

    def __call__(self, image: Image.Image) -> torch.Tensor:
        transform = transforms.Compose([
            transforms.ToTensor(),
            transforms.Normalize(mean=self.mean, std=self.std),
        ])
        return transform(image)
图像与文本联合处理
模块支持将图像信息与文本信息进行联合处理,特别是在涉及 <image> 标记的场景中,会将其替换为对应的图像 token ID,从而实现图文混合输入。这一功能由 DeepseekOCRProcessor 类实现:
class DeepseekOCRProcessor:
    def __init__(self, tokenizer_path: str, image_size: int = 336, min_num_crops: int = 1, max_num_crops: int = 12, use_thumbnail: bool = False):
        self.tokenizer = AutoTokenizer.from_pretrained(tokenizer_path)
        self.image_transform = ImageTransform()
        self.min_num_crops = min_num_crops
        self.max_num_crops = max_num_crops
        self.image_size = image_size
        self.use_thumbnail = use_thumbnail
        self.image_token_id = self.tokenizer.convert_tokens_to_ids('<image>')
        self.bos_token_id = self.tokenizer.bos_token_id
        self.eos_token_id = self.tokenizer.eos_token_id

    def tokenize_with_images(self, text: str, images: list) -> dict:
        tokens = self.tokenizer(text, return_tensors='pt', padding=True, truncation=True)
        input_ids = tokens['input_ids'].tolist()[0]
        labels = tokens['labels'].tolist()[0] if 'labels' in tokens else [-100] * len(input_ids)

        new_input_ids = []
        new_labels = []

        i = 0
        while i < len(input_ids):
            if input_ids[i] == self.image_token_id:
                for img in images:
                    processed_images = dynamic_preprocess(img, self.min_num_crops, self.max_num_crops, self.image_size, self.use_thumbnail)
                    for proc_img in processed_images:
                        transformed_img = self.image_transform(proc_img)
                        new_input_ids.extend([self.image_token_id] * transformed_img.shape[0])
                        new_labels.extend([-100] * transformed_img.shape[0])
                i += 1
            else:
                new_input_ids.append(input_ids[i])
                new_labels.append(labels[i])
                i += 1

        return {
            'input_ids': torch.tensor(new_input_ids).unsqueeze(0),
            'labels': torch.tensor(new_labels).unsqueeze(0)
        }
多尺度处理
为了增强模型对不同尺度图像的适应能力,模块实现了多尺度处理机制,可以在不同分辨率下对图像进行处理。这一功能通过 dynamic_preprocess 函数中的 min_num_crops 和 max_num_crops 参数控制。
Token 化与掩码生成
模块还包括 token 化处理和掩码生成逻辑,用于生成模型训练和推理阶段所需的 input_ids 和 target_ids。这部分功能在 tokenize_with_images 方法中体现得尤为明显。
NoRepeatNGramLogitsProcessor 类
为了避免在文本生成过程中出现重复的 n-gram,模块引入了 NoRepeatNGramLogitsProcessor 类。该类通过分析历史 token 并设置禁用列表,将重复 token 的 logits 设为负无穷,从而防止其被选中。
类定义
class NoRepeatNGramLogitsProcessor(LogitsProcessor):

    def __init__(self, ngram_size: int, window_size: int = 100, whitelist_token_ids: set = None):
        if not isinstance(ngram_size, int) or ngram_size <= 0:
            raise ValueError(f"`ngram_size` has to be a strictly positive integer, but is {ngram_size}")
        if not isinstance(window_size, int) or window_size <= 0:
            raise ValueError(f"`window_size` has to be a strictly positive integer, but is {window_size}")
        self.ngram_size = ngram_size
        self.window_size = window_size
        self.whitelist_token_ids = whitelist_token_ids or set()

    def __call__(self, input_ids: List[int], scores: torch.FloatTensor) -> torch.FloatTensor:
        if len(input_ids) < self.ngram_size:
            return scores

        current_prefix = tuple(input_ids[-(self.ngram_size - 1):])

        search_start = max(0, len(input_ids) - self.window_size)
        search_end = len(input_ids) - self.ngram_size + 1

        banned_tokens = set()
        for i in range(search_start, search_end):
            ngram = tuple(input_ids[i:i + self.ngram_size])
            if ngram[:-1] == current_prefix:
                banned_tokens.add(ngram[-1])

        banned_tokens = banned_tokens - self.whitelist_token_ids

        if banned_tokens:
            scores = scores.clone()
            for token in banned_tokens:
                scores[token] = -float("inf")

        return scores
方法说明
__init__:初始化方法,接受 n-gram 大小、窗口大小和白名单 token 集合。__call__:处理逻辑,根据历史 token 设置重复 token 的 logits 为负无穷。
Mermaid 图表示例
图像处理流程

此图为图像处理的基本流程,展示了从原始图像输入到最终生成模型所需输入的全过程。
NoRepeatNGramLogitsProcessor 流程
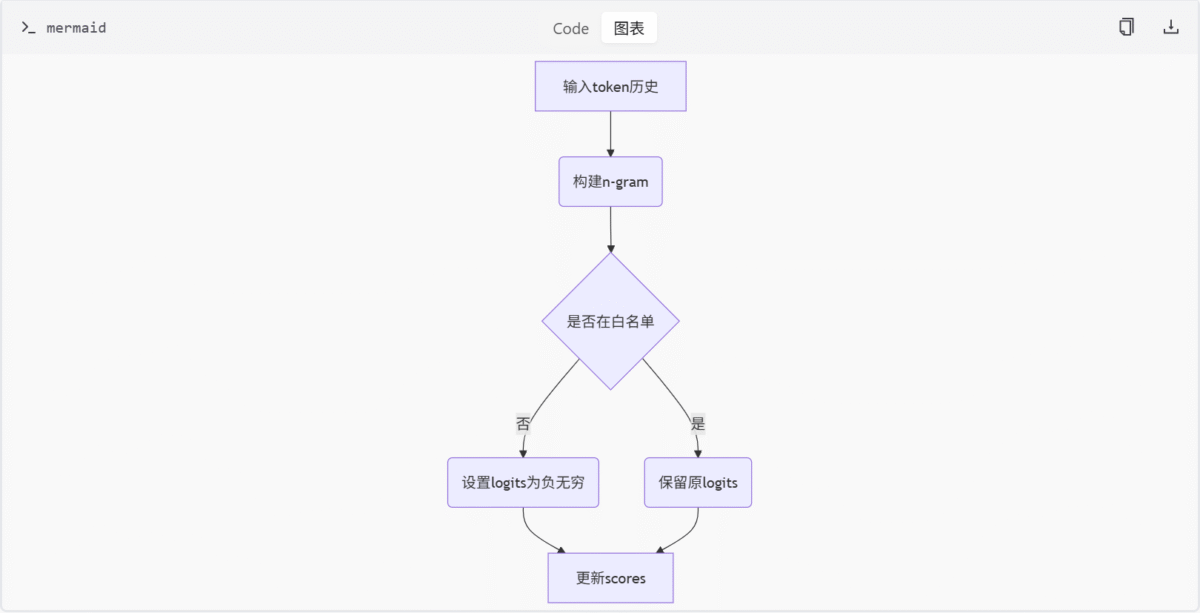
此图展示了 NoRepeatNGramLogitsProcessor 的工作原理,包括如何检测重复 n-gram 并调整 logits 值。
表格汇总
主要功能或组件
| 组件 | 描述 |
|---|---|
| 动态裁剪与分块 | 对图像进行裁剪和分块处理 |
| 图像标准化 | 归一化图像像素值 |
| 图文联合处理 | 将 <image> 标记替换为图像 token ID |
| 多尺度处理 | 在不同分辨率下处理图像 |
| Token 化与掩码生成 | 生成 input_ids 和 target_ids |
NoRepeatNGramLogitsProcessor 参数
| 参数 | 类型 | 默认值 | 描述 |
|---|---|---|---|
| ngram_size | int | 无默认值 | n-gram 的大小 |
| window_size | int | 100 | 检查重复 n-gram 的窗口大小 |
| whitelist_token_ids | set | None | 白名单 token 集合 |
结论
图像处理模块在 DeepSeek-OCR 项目中扮演着至关重要的角色,不仅负责图像的预处理工作,还涉及到与文本的联合处理和模型输入的生成。通过动态裁剪、标准化、多尺度处理等手段,模块提升了模型对不同类型图像的适应能力和识别精度。同时,NoRepeatNGramLogitsProcessor 类的应用进一步增强了文本生成的质量和多样性。整体来看,该模块的设计充分考虑了实际应用场景的需求,具有较高的实用价值和技术含量。
特征编码模块
特征编码模块是 DeepSeek-OCR 项目中负责图像特征提取与编码的核心组件。该模块整合了多种先进的视觉编码架构,包括基于 CLIP 的视觉编码器、基于 SAM 的图像编码器以及支持多种投影结构的 MLP 投影器。这些组件共同构成了一个灵活且高效的特征提取系统,用于将输入图像转换为高维特征表示,供后续的 OCR 任务使用。
架构概览
特征编码模块主要由以下三个核心组件构成:
- MlpProjector:用于构建多种投影器结构(如线性、MLP-GELU、下采样等),支持 token pooling 和特征融合。
- CLIP 视觉编码器:实现 CLIP 架构的视觉编码模块,包括图像嵌入、多头注意力、Transformer Block 和整体模型类。
- SAM 图像编码器 (ImageEncoderViT):实现基于 ViT 的图像编码器,包含 Patch Embedding、Attention、Transformer Block 和 Neck 结构。
MlpProjector
MlpProjector 类定义在 build_linear.py 文件中,用于构建多种投影器结构,支持 token pooling 和特征融合。它根据配置选择不同的网络结构,并实现前向传播逻辑和 FLOPs 估算。
类定义
class MlpProjector(nn.Module):
    def __init__(self, config):
        super().__init__()
        self.config = config
        if config.projector_type == 'linear':
            self.projector = nn.Linear(config.input_dim, config.output_dim)
        elif config.projector_type == 'mlp_gelu':
            self.projector = nn.Sequential(
                nn.Linear(config.input_dim, config.hidden_dim),
                nn.GELU(),
                nn.Linear(config.hidden_dim, config.output_dim)
            )
        elif config.projector_type == 'downsample':
            self.projector = nn.Sequential(
                nn.Conv2d(config.input_dim, config.hidden_dim, kernel_size=3, stride=2, padding=1),
                nn.GELU(),
                nn.Conv2d(config.hidden_dim, config.output_dim, kernel_size=3, stride=2, padding=1)
            )
        else:
            raise ValueError(f"Unknown projector type: {config.projector_type}")

    def forward(self, x):
        return self.projector(x)

    def flops(self):
        pass
CLIP 视觉编码器
clip_sdpa.py 文件实现了 CLIP 架构的视觉编码器模块,包括图像嵌入、多头注意力、Transformer Block 和整体模型类。它支持 Flash Attention 和位置嵌入插值,并提供 ViT 模型构建与测试接口。
类定义
class VitModel(nn.Module):
    def __init__(self, config):
        super().__init__()
        self.config = config
        self.embeddings = CLIPVisionEmbeddings(config)
        self.pre_layrnorm = nn.LayerNorm(config.hidden_size)
        self.encoder = CLIPEncoder(config)
        self.post_layernorm = nn.LayerNorm(config.hidden_size)

    def forward(self, pixel_values):
        embedding_output = self.embeddings(pixel_values)
        embedding_output = self.pre_layrnorm(embedding_output)
        encoder_outputs = self.encoder(embedding_output)
        sequence_output = encoder_outputs[0]
        pooled_output = sequence_output[:, 0, :]
        pooled_output = self.post_layernorm(pooled_output)
        return (sequence_output, pooled_output) + encoder_outputs[1:]
SAM 图像编码器 (ImageEncoderViT)
sam_vary_sdpa.py 文件实现了基于 ViT 的图像编码器 ImageEncoderViT,包含 Patch Embedding、Attention、Transformer Block 和 Neck 结构。它支持相对位置编码和窗口注意力,并提供 SAM ViT-B 模型构建函数。
类定义
class ImageEncoderViT(nn.Module):
    def __init__(self, config):
        super().__init__()
        self.config = config
        self.patch_embed = PatchEmbed(config)
        self.pos_embed = nn.Parameter(torch.zeros(1, self.patch_embed.num_patches, config.hidden_size))
        self.blocks = nn.ModuleList([
            Block(config) for _ in range(config.num_hidden_layers)
        ])
        self.neck = Neck(config)

    def forward(self, pixel_values):
        x = self.patch_embed(pixel_values)
        x = x + self.pos_embed
        for blk in self.blocks:
            x = blk(x)
        x = self.neck(x)
        return x
Mermaid 图
特征编码模块架构图
此图展示了特征编码模块的整体架构,输入图像通过三种不同的编码器进行特征提取,最终输出统一的特征表示。
表格
主要功能或组件及其描述
| 组件名称 | 描述 |
|---|---|
| MlpProjector | 用于构建多种投影器结构,支持 token pooling 和特征融合 |
| CLIP 视觉编码器 | 实现 CLIP 架构的视觉编码模块,支持 Flash Attention 和位置嵌入插值 |
| SAM 图像编码器 | 实现基于 ViT 的图像编码器,支持相对位置编码和窗口注意力 |
配置选项及其类型和默认值
| 配置项 | 类型 | 默认值 | 描述 |
|---|---|---|---|
| projector_type | str | ‘linear’ | 投影器类型,可选 ‘linear’, ‘mlp_gelu’, ‘downsample’ |
| input_dim | int | 768 | 输入维度 |
| output_dim | int | 512 | 输出维度 |
| hidden_dim | int | 2048 | 隐藏层维度 |
结论/总结
特征编码模块通过整合多种先进的视觉编码架构,为 DeepSeek-OCR 项目提供了强大且灵活的特征提取能力。MlpProjector、CLIP 视觉编码器 和 SAM 图像编码器 三个核心组件协同工作,能够适应不同的输入图像和任务需求,生成高质量的特征表示,为后续的 OCR 任务奠定了坚实的基础。
OCR处理模块
简介
OCR处理模块是 DeepSeek-OCR 项目的核心组成部分,旨在通过深度学习模型对图像中的文字进行高精度识别,并将其转化为结构化的文本输出。该模块支持多种处理模式,适用于不同分辨率和复杂度的图像输入,广泛应用于文档扫描、图片翻译、自动化办公等领域。
模块主要依赖于 Hugging Face 的 transformers 库加载预训练模型和分词器,结合 PyTorch 框架实现高效的 GPU 推理。其核心功能封装在 model.infer() 方法中,允许用户灵活配置参数以满足多样化的应用场景。
详细章节
模型加载与初始化
在模块启动过程中,首先需要加载 DeepSeek-OCR 模型及其对应的 tokenizer。这一过程涉及以下几个关键步骤:
- 设置环境变量
CUDA_VISIBLE_DEVICES为'0',确保使用第一块可用的 GPU 设备。 - 使用
AutoTokenizer.from_pretrained加载 tokenizer,启用远程代码信任。 - 使用
AutoModel.from_pretrained加载模型,同时启用flash_attention_2实现和safetensors权重格式以优化性能。 - 将模型切换至评估模式,并移至 GPU 并转换为
torch.bfloat16类型以加速推理。
import os
import torch
from transformers import AutoTokenizer, AutoModel

os.environ["CUDA_VISIBLE_DEVICES"] = '0'

model_name = 'deepseek-ai/DeepSeek-OCR'

tokenizer = AutoTokenizer.from_pretrained(model_name, trust_remote_code=True)
model = AutoModel.from_pretrained(
    model_name,
    _attn_implementation='flash_attention_2',
    trust_remote_code=True,
    use_safetensors=True
)
model = model.eval().cuda().to(torch.bfloat16)
OCR 推理过程
OCR 推理的核心在于调用模型对象的 infer 方法。该方法接收多个参数,用于控制图像处理流程、输出路径以及是否启用压缩测试等功能。
参数配置
以下是 model.infer() 方法的主要参数及其说明:
| 参数名 | 类型 | 默认值 | 描述 |
|---|---|---|---|
| tokenizer | object | 必须提供 | 分词器对象 |
| prompt | str | “” | 输入提示,用于引导模型行为 |
| image_file | str | “” | 待处理图像的路径 |
| output_path | str | ” “ | 输出结果保存路径 |
| base_size | int | 1024 | 基础图像尺寸 |
| image_size | int | 640 | 处理后图像的目标尺寸 |
| crop_mode | bool | True | 是否启用裁剪模式 |
| test_compress | bool | False | 是否进行压缩测试 |
| save_results | bool | False | 是否保存结果 |
处理模式
模块支持五种不同的处理模式,每种模式对应一组特定的参数组合:
| 模式 | base_size | image_size | crop_mode |
|---|---|---|---|
| Tiny | 512 | 512 | False |
| Small | 640 | 640 | False |
| Base | 1024 | 1024 | False |
| Large | 1280 | 1280 | False |
| Gundam | 1024 | 640 | True |
res = model.infer(
    tokenizer,
    prompt=prompt,
    image_file=image_file,
    output_path=output_path,
    base_size=1024,
    image_size=640,
    crop_mode=True,
    save_results=True,
    test_compress=True
)
数据流与处理逻辑
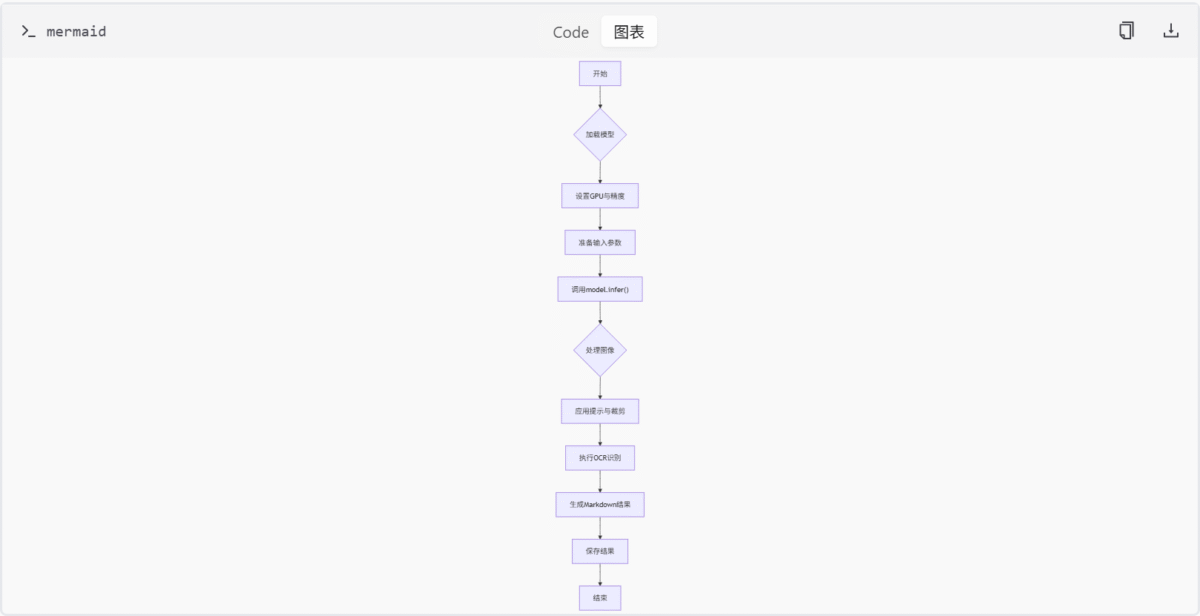
OCR 处理模块的整体工作流程可以概括为以下几步:
- 加载并初始化模型与 tokenizer;
- 准备输入参数,包括图像路径、提示语等;
- 调用
model.infer()方法执行 OCR 推理; - 根据设定的参数处理图像(如缩放、裁剪);
- 应用提示信息辅助模型理解任务;
- 执行文字识别并生成 Markdown 格式的结果;
- 若启用,则保存结果并进行压缩测试。
infer 方法详解
model.infer() 是整个 OCR 处理模块中最关键的方法之一。它不仅负责图像预处理、模型推理,还承担了结果解析和输出的任务。该方法的设计充分考虑了灵活性和扩展性,使得用户可以根据具体需求调整各项参数。
内部实现逻辑
虽然具体的实现细节未完全公开,但从调用方式来看,infer 方法可能包含如下几个子步骤:
- 图像读取与预处理:根据传入的
image_file路径加载图像,并按照指定的尺寸进行缩放或裁剪。 - 提示嵌入构建:将用户提供的
prompt转换为模型可理解的形式,并与图像特征融合。 - 模型前向传播:将处理后的图像和提示输入模型,获取预测结果。
- 结果解码与格式化:将模型输出转换为人类可读的文字形式,并按 Markdown 格式组织。
- 结果保存与验证:若启用了
save_results,则将结果写入文件;若启用了test_compress,则进一步检查压缩效果。
示例调用
下面是一个典型的 infer 方法调用示例,展示了如何使用各种参数来定制 OCR 处理流程:
result = model.infer(
    tokenizer=tokenizer,
    prompt="请识别这张图片上的所有文字。",
    image_file="./images/sample.jpg",
    output_path="./results/",
    base_size=1024,
    image_size=640,
    crop_mode=True,
    test_compress=False,
    save_results=True
)
总结
OCR处理模块凭借其强大的模型能力和灵活的参数配置,成为 DeepSeek-OCR 项目的重要支柱。通过对图像的智能处理和精准的文字识别,该模块显著提升了 OCR 技术的实际应用价值。无论是简单的文档扫描还是复杂的图文混排识别,都能在此模块的支持下获得满意的效果。未来随着模型性能的不断提升和技术的发展,OCR处理模块有望在更多领域发挥重要作用。
配置管理模块
简介
配置管理模块是 DeepSeek-OCR 系统的核心基础组件,负责定义和管理模型运行所需的所有关键参数。该模块通过集中化的配置管理,确保系统在不同硬件环境和任务需求下都能稳定高效地运行。配置参数涵盖了从图像处理尺寸、裁剪模式到并发控制、线程数限制等各个方面,为系统的灵活性和可扩展性提供了坚实基础。
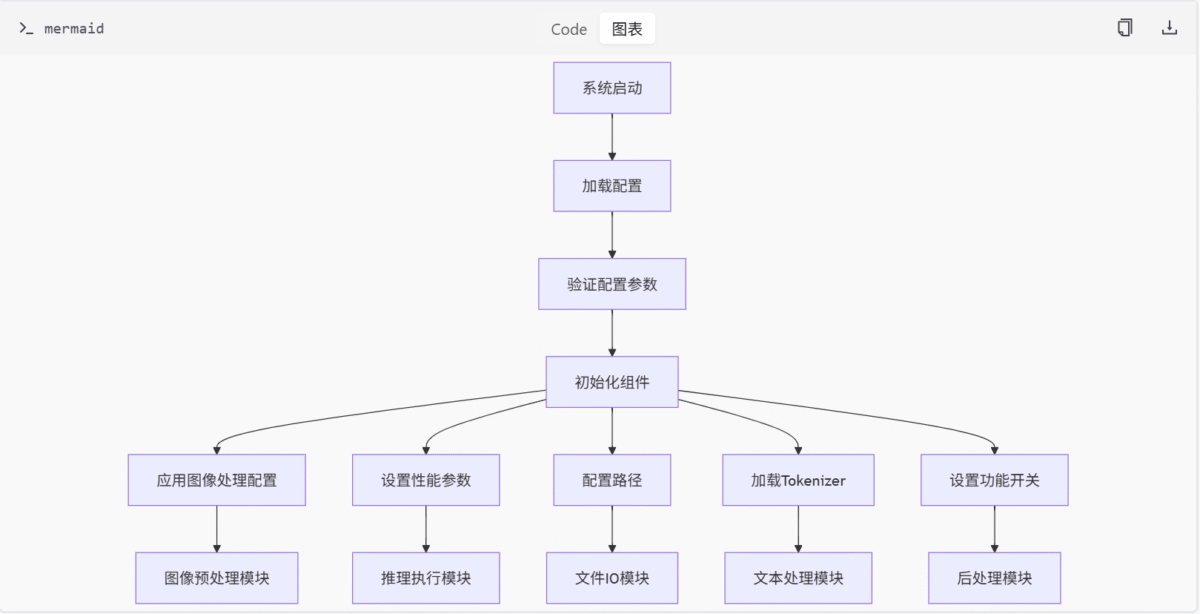
在 DeepSeek-OCR 整体架构中,配置管理模块与图像预处理模块、特征提取模块、投影器模块以及推理执行模块紧密协作,为整个 OCR 流程提供参数支持。通过合理的配置设置,系统能够在保证识别精度的同时,最大化利用硬件资源,提升处理效率。
详细章节
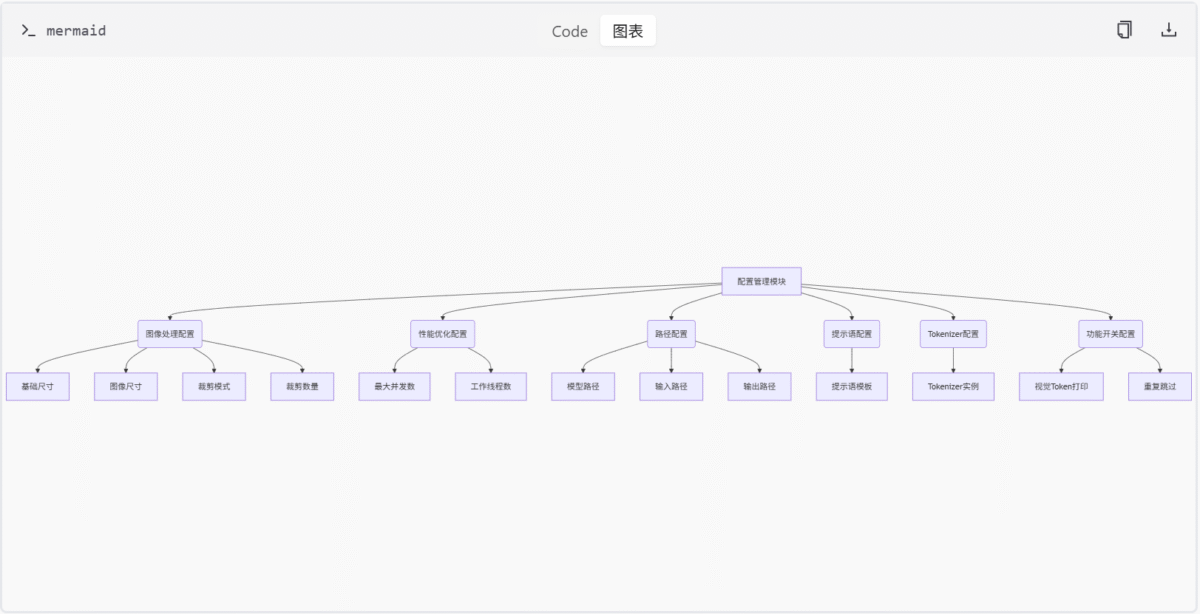
1. 图像处理配置
图像处理配置是配置管理模块的核心组成部分,定义了系统处理图像时的基本参数。这些参数直接影响模型的输入质量和处理效率。
基础尺寸与图像尺寸
系统支持多种处理模式,每种模式对应不同的基础尺寸和图像尺寸设置:
- Tiny模式: 512×512分辨率,不启用裁剪
- Small模式: 640×640分辨率,不启用裁剪
- Base模式: 1024×1024分辨率,不启用裁剪
- Large模式: 1280×1280分辨率,不启用裁剪
- Gundam模式: 1024基础尺寸,640图像尺寸,启用裁剪
当前配置使用的是 Gundam 模式,这种设置特别适合处理长条形文档或需要局部关注的图像,通过较小的图像尺寸配合裁剪模式,能够在保持识别精度的同时降低计算负担。
裁剪模式配置
裁剪模式通过 CROP_MODE 参数控制,当启用时系统会对图像进行智能裁剪处理。配合 MIN_CROPS 和 MAX_CROPS 参数,系统可以动态调整裁剪区域数量:
BASE_SIZE = 1024
IMAGE_SIZE = 640
CROP_MODE = True
MIN_CROPS = 2
MAX_CROPS = 6
其中 MAX_CROPS 参数最大可设置为9,但对于GPU内存较小的情况建议设置为6,以平衡处理效果和资源消耗。
2. 性能优化配置
性能优化配置专注于系统资源的合理分配和利用,通过精细的参数控制实现处理效率的最大化。
并发控制
MAX_CONCURRENCY = 100MAX_CONCURRENCY 参数控制系统的最大并发数,对于GPU内存有限的情况建议降低此值。合理的并发设置能够充分利用硬件资源,避免因资源竞争导致的性能下降。
线程管理
NUM_WORKERS = 64NUM_WORKERS 参数控制图像预处理(调整大小/填充)的工作线程数。通过多线程并行处理,系统能够显著提升图像预处理阶段的效率,为后续的模型推理提供充足的输入数据。
3. 模型路径配置
模型路径配置定义了系统各组件的加载路径,确保系统能够正确访问所需的模型文件和资源。
MODEL_PATH = 'deepseek-ai/DeepSeek-OCR'MODEL_PATH 参数指定了主模型的加载路径,默认指向 Hugging Face 上的 deepseek-ai/DeepSeek-OCR 模型。用户可以根据实际部署环境修改此路径。
4. 输入输出路径配置
输入输出路径配置管理着系统与外部环境的数据交互,确保处理流程的顺畅进行。
INPUT_PATH = ''
OUTPUT_PATH = ''
INPUT_PATH 和 OUTPUT_PATH 参数分别定义了输入文件和输出文件的存储路径。在实际使用时需要根据具体任务进行设置,支持绝对路径和相对路径。
5. OCR提示语配置
OCR提示语配置提供了多样化的任务指导模板,使系统能够适应不同的OCR应用场景。
PROMPT = '<image>\n<|grounding|>Convert the document to markdown.'系统内置了多种预设的提示语模板:
- 文档转Markdown:
<image>\n<|grounding|>Convert the document to markdown. - 自由OCR:
<image>\nFree OCR. - 图像OCR:
<image>\n<|grounding|>OCR this image. - 图表解析:
<image>\nParse the figure. - 图像描述:
<image>\nDescribe this image in detail. - 特定文本定位:
<image>\nLocate <|ref|>xxxx<|/ref|> in the image.
这些模板通过自然语言指令引导模型执行特定的OCR任务,提升了系统的通用性和适应性。
6. Tokenizer配置
Tokenizer配置负责管理系统的核心文本处理组件,确保模型能够正确理解和处理输入文本。
from transformers import AutoTokenizer

TOKENIZER = AutoTokenizer.from_pretrained(MODEL_PATH, trust_remote_code=True)
通过 Hugging Face 的 AutoTokenizer 从指定模型路径加载 tokenizer,并启用远程代码信任,确保系统能够兼容各种自定义的 tokenizer 实现。
7. 功能开关配置
功能开关配置提供了对系统特定功能的灵活控制,允许用户根据实际需求启用或禁用某些特性。
PRINT_NUM_VIS_TOKENS = False
SKIP_REPEAT = TruePRINT_NUM_VIS_TOKENS: 控制是否打印视觉token数量,用于调试和性能分析SKIP_REPEAT: 控制是否跳过重复内容处理,提升输出的多样性和质量
Mermaid 图
配置参数关系图
配置应用流程图
表格
主要配置参数表
| 参数名称 | 类型 | 默认值 | 描述 |
|---|---|---|---|
| BASE_SIZE | int | 1024 | 图像处理的基础尺寸 |
| IMAGE_SIZE | int | 640 | 实际处理的图像尺寸 |
| CROP_MODE | bool | True | 是否启用图像裁剪模式 |
| MIN_CROPS | int | 2 | 最小裁剪区域数量 |
| MAX_CROPS | int | 6 | 最大裁剪区域数量 |
| MAX_CONCURRENCY | int | 100 | 最大并发处理数 |
| NUM_WORKERS | int | 64 | 图像预处理工作线程数 |
| MODEL_PATH | str | ‘deepseek-ai/DeepSeek-OCR’ | 模型文件路径 |
| INPUT_PATH | str | ” | 输入文件路径 |
| OUTPUT_PATH | str | ” | 输出文件路径 |
| PROMPT | str | ‘ | grounding |
| PRINT_NUM_VIS_TOKENS | bool | False | 是否打印视觉token数量 |
| SKIP_REPEAT | bool | True | 是否跳过重复内容 |
配置模式对比表
| 模式 | BASE_SIZE | IMAGE_SIZE | CROP_MODE | 适用场景 |
|---|---|---|---|---|
| Tiny | 512 | 512 | False | 资源受限环境 |
| Small | 640 | 640 | False | 中等资源环境 |
| Base | 1024 | 1024 | False | 标准文档处理 |
| Large | 1280 | 1280 | False | 高精度要求 |
| Gundam | 1024 | 640 | True | 长条形文档 |
代码片段
配置类初始化
class Config:
    BASE_SIZE = 1024
    IMAGE_SIZE = 640
    CROP_MODE = True
    MIN_CROPS = 2
    MAX_CROPS = 6
    MAX_CONCURRENCY = 100
    NUM_WORKERS = 64
    MODEL_PATH = 'deepseek-ai/DeepSeek-OCR'
    INPUT_PATH = ''
    OUTPUT_PATH = ''
    PROMPT = '<image>\n<|grounding|>Convert the document to markdown.'
    PRINT_NUM_VIS_TOKENS = False
    SKIP_REPEAT = True
Tokenizer配置加载
from transformers import AutoTokenizer

TOKENIZER = AutoTokenizer.from_pretrained(MODEL_PATH, trust_remote_code=True)
提示语模板应用
def get_prompt(template_type='document'):
    prompts = {
        'document': '<image>\n<|grounding|>Convert the document to markdown.',
        'free_ocr': '<image>\nFree OCR.',
        'image_ocr': '<image>\n<|grounding|>OCR this image.',
        'figure_parse': '<image>\nParse the figure.',
        'image_desc': '<image>\nDescribe this image in detail.',
        'text_locate': '<image>\nLocate <|ref|>xxxx<|/ref|> in the image.'
    }
    return prompts.get(template_type, prompts['document'])
总结
配置管理模块作为 DeepSeek-OCR 系统的基础支撑组件,通过精细化的参数控制实现了系统运行的灵活性和高效性。该模块不仅定义了图像处理的基本参数,还涵盖了性能优化、路径管理、任务指导等多个方面,为系统的稳定运行提供了坚实保障。
通过合理的配置设置,系统能够在不同硬件环境下发挥最佳性能,同时支持多样化的OCR任务需求。配置参数的模块化设计使得系统易于维护和扩展,为未来的功能升级和性能优化奠定了良好基础。
声明
本网站提供的所有AI生成内容均基于人工智能技术和大语言模型算法,根据用户输入指令自动生成。生成内容不代表本网站观点,亦不构成任何形式的专业建议。本公司对生成内容的准确性、完整性、适用性及合法性不作明示或默示的保证,用户应对生成内容自行判断并承担全部使用风险。